tiling
Tile Installation Cost per Sq Ft: From Tile Price to Finished Floor
Work out a complete tile installation budget, including box rounding, adhesive, grout, preparation, labour and delivery, with a 120 sq ft example.
At a glance
In this guide9 sections
There is a familiar moment in a tile showroom: you find a tile you like, see “₹60 per sq ft” on the sample and feel the budget settling into place. The room is 120 sq ft. Surely that makes ₹7,200.
It would, if tiles were sold in precisely the quantity installed and arrived on a perfectly prepared floor with adhesive, grout and labour included. A real order has a few more stages. In the worked example here, a ₹60/sq ft tile leads to a ₹19,040 installation subtotal for a 120 sq ft room, or ₹158.67 per installed sq ft. The example includes complete tile boxes, adhesive, grout, labour, a small preparation allowance, consumables and delivery.
Every rate below is illustrative, in Indian rupees. None is a verified current market price. The method travels well: measure the work, establish product quantities, price the scope and divide by the installed area only at the end.
Which “per square foot” price are you hearing?
At least three different rates can appear in the same conversation. The tile supplier's rate describes the material you purchase. The installer's labour rate describes the work included in that labour quote. The complete installed rate spreads all the agreed project costs across the finished floor area.
They can all be valid, but they are not substitutes for each other. A tile-only quote cannot be compared directly with a supply-and-install quote. Even two labour rates may cover different tasks: one may include normal cutting and grouting, while another adds them separately.
Ask for the price to be attached to a sentence. “₹35 per sq ft for laying these tiles on this prepared base, including these operations” is much more useful than “labour ₹35.” The extra words are often where the budget becomes dependable.
Measure the floor before choosing the allowance
Our example room is 12 × 10 ft, giving 120 sq ft, or 11.1484 m². We assume the full rectangle will be tiled. There are no separate door recesses, columns or permanently untiled areas in the example.
In a real room, sketch the outline and record what will receive tiles. A small doorway recess can be easy to miss. A kitchen cabinet footprint might or might not be tiled depending on the construction sequence and agreed scope. Make that decision explicitly instead of deducting every piece of furniture from the plan.
The floor area is only the beginning of a purchase calculation. Tile size, the starting line, pattern direction and the usefulness of offcuts affect the order. Our room tile quantity guide explains that layout stage in more detail.
From 120 sq ft of floor to nine boxes of tiles
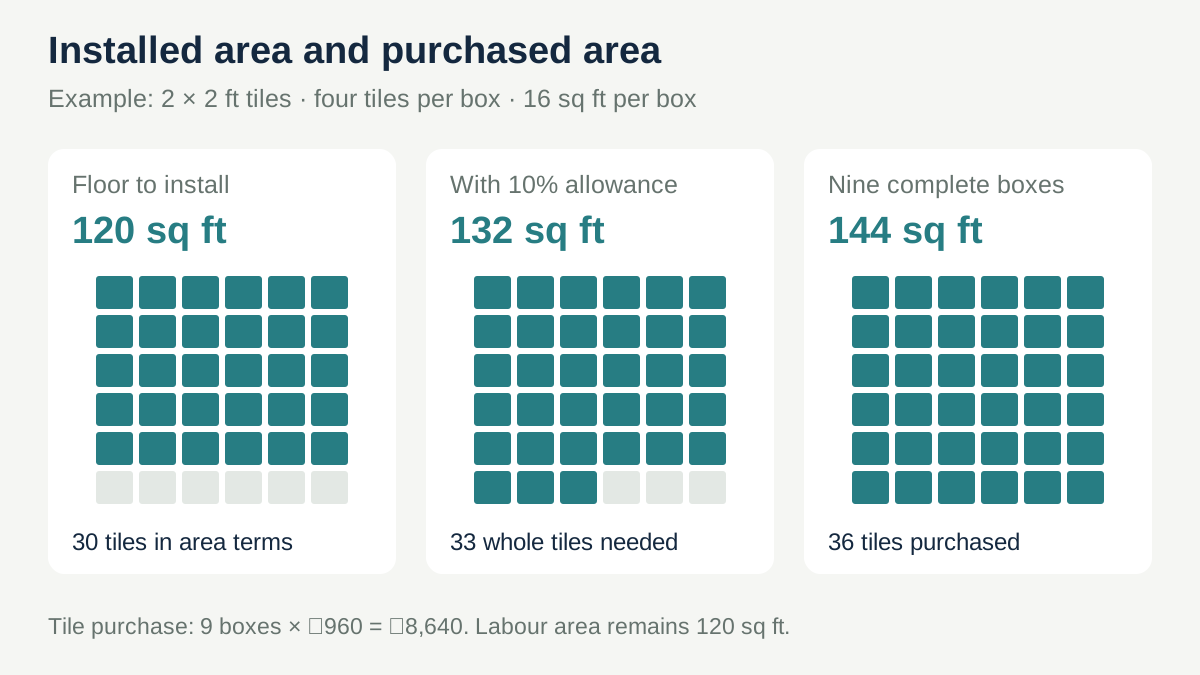
Suppose the selected tile measures 2 × 2 ft, covering 4 sq ft, and comes four tiles to a box. One box therefore contains 16 sq ft.
For a simple example, allow 10% above the measured area:
120 × 1.10 = 132 sq ft of planned tile coverage
132 ÷ 4 = 33 tiles
33 ÷ 4 tiles per box = 8.25 boxes → buy 9 complete boxes
Nine boxes contain 36 tiles, or 144 sq ft. At the assumed tile rate of ₹60/sq ft, each box costs 16 × ₹60 = ₹960, so the purchase is 9 × ₹960 = ₹8,640.
This does not mean 20% of the tiles must be wasted. It means the combination of a 10% planning allowance and complete packaging produces a 144 sq ft order. Some spare tiles may remain intact. Keep them labelled with the product, batch and room if you want them for future repairs.
The appropriate allowance depends on the layout. A diagonal pattern, directional veining or many small cuts can behave differently from a straightforward grid. Check the planned cuts with the installer rather than treating 10% as a universal answer.
Adhesive: calculate from the chosen system, not a guessed bag count
Adhesive consumption depends on the product, tile, substrate, trowel and application method. The correct product also depends on where the tiles are being installed. A dry interior floor, an exterior surface and a shower are not automatically the same application.
For this worked calculation, assume the chosen product and planned application require 4 kg/m², and add a 5% handling allowance. This is a hypothetical consumption input, not a recommendation for every adhesive:
11.1484 m² × 4 kg/m² × 1.05 = 46.82 kg
If it is sold in 20 kg bags, that means three bags, or 60 kg purchased. At an example ₹700 per bag, the adhesive line is ₹2,100.
Read the actual product data sheet and have the installer confirm the expected consumption for the selected tile and base. If the surface needs substantial levelling, price the appropriate preparation separately. Do not quietly assume that more tile adhesive is a suitable substitute for every base repair.
The remaining part-bag is also a practical issue. Storage, shelf life and whether unopened bags can be returned should be checked with the supplier. Purchase rounding is not a reason to use a product outside its instructions.
Grout is a joint calculation, not just a floor-area calculation
Two floors of the same area can need different amounts of grout. Many small tiles create more joints than a few large tiles; wider and deeper joints need more material. Weber's grout technical data illustrates this dependence on tile dimensions and joint geometry. It is a technical reference, not an India price source or a product specification for this particular room.
Assume our selected grout and joint arrangement have a calculated consumption of 0.3 kg/m². With a 5% handling allowance:
11.1484 × 0.3 × 1.05 = 3.51 kg
At ₹250 per 1 kg pack, buying four packs costs ₹1,000. Replace that consumption with the manufacturer's calculation for your actual tile thickness and joints. A different grout type may also have different purchasing units and installation requirements.
Discuss movement joints and changes of plane with the installer as part of the system detail. A bag of ordinary grout is not a universal answer for every joint in the room.
Put the whole example on one sheet
The labour assumption below includes ordinary laying, routine cuts and grouting for this simple room. The preparation allowance is a separate example line for minor work on an otherwise suitable base. Major repairs or old-floor removal are excluded.
| Item | Example quantity and rate | Amount |
|---|---|---|
| Tiles | 9 boxes × ₹960 | ₹8,640 |
| Adhesive | 3 × 20 kg bags at ₹700 | ₹2,100 |
| Grout | 4 × 1 kg packs at ₹250 | ₹1,000 |
| Laying labour | 120 sq ft × ₹35 | ₹4,200 |
| Minor base preparation | 120 sq ft × ₹15 | ₹1,800 |
| Small consumables | Allowance | ₹500 |
| Delivery and handling | Allowance | ₹800 |
| Installation subtotal | — | ₹19,040 |
Divide by the 120 sq ft installed floor, not the 144 sq ft purchased:
₹19,040 ÷ 120 = ₹158.67 per installed sq ft
Even the tile purchase alone works out to ₹8,640 ÷ 120 = ₹72 per installed sq ft. The showroom's ₹60 rate remains correct; the extra amount comes from allowance and packaging. This is why a complete example is more informative than a single headline rate.
Taxes, waterproofing, skirting, thresholds, substantial levelling, demolition, debris removal, stairs and unusual patterns are not included in this subtotal. Add the applicable items from your quotation. A reserve, if you choose one, should be shown after the defined scope rather than hidden inside a material quantity.
The base can matter more than the tile price
An empty room with a sound, prepared base is different from an occupied flat where the old floor must be removed. Access, dust control, furniture movement and debris disposal can all change the job. Before comparing two installation quotes, make sure both installers have seen the same starting condition.
Door clearances and transitions deserve attention too. A new floor build-up can meet an adjoining room or bathroom at an awkward level. Resolve the intended levels and any thresholds before the first tile is fixed. The answer may involve preparation work that a tile-only estimate never considered.
In a bathroom, slope, waterproofing and drain details need to be coordinated with the tile layout. Tile installation and waterproofing have different roles. The bathroom wall tile height guide explains how water exposure influences finish decisions without treating the visible tile line as a complete waterproofing specification.
Small details that deserve their own quantity
Skirting is usually measured along the relevant wall lengths, after the agreed deductions. It should not disappear inside a floor-area calculation. Tile cut into skirting also consumes material and labour, while factory skirting pieces have their own packaging. Use the skirting measurement guide to keep that work visible.
The same applies to thresholds, niche shelves, steps and polished exposed edges. A room can have a modest floor area and still contain several labour-intensive details. Ask whether the quote includes them and how they are measured.
Before buying, confirm the actual tile dimensions, pieces per box, batch availability, breakage arrangements and delivery charges. A product name alone may not identify the size or finish that was priced. Photograph the box label and keep it with the invoice.
Build your own version of the estimate
Start with the measured surfaces in the tile calculator, then check purchasing units with the tile box calculator. Keep the preparation, adhesive, grout, labour and other applicable quotation lines beside that quantity calculation. Calculator output is useful only when its inputs match the job you are asking the installer to do.
When the work is complete, retain a few clearly identified spare tiles if the order allows. More immediately, retain the estimate with its assumptions. It should explain why nine boxes were bought, what the labour included and which parts of the base were prepared. Then the final bill can be checked against a shared plan, rather than against a remembered number on a showroom sample.